If you flip back a few posts, you can see where I left off the previous fall - just to the left of the front door. So that is where I started...
Next I had to prep the exposed concrete foundation wall with lath and scratch coat. I wasn't sure I needed to do this or not, but the concrete is coated with a spray-on waterproofing, so to be safe, I added the scratch coat. That was 2-3 days to wrap up. All the other scratch coat I had wrapped up last fall so that the wall would be a bit more protected for the winter. Now it is go time for the big wall!
The above was about 1.5 weeks of work. It took the entire rest of the summer and into the fall to wrap this all up. So let's walk through it...
I started with all the ground level work, or work that only required the short step platform to reach. That was the quicker part of this.
Then it got more interesting, and slower as I went up the wall. I set up a rolling scaffold and used the tractor to lift a box of stones up to save time. This still required many trips up and down to find the right stones, but having a box on the forks plus the partial box on the scaffold did speed it up. These photos skip days in an effort to not bog this down too much.
Final photos below.
But wait! There's more! I also needed to do the posts on the screen porch and the front entry. These required more prep work as I had to box them out with pressure treated lumber, then cover them with 2 layers of tar paper, lath and scratch coat. But prior to doing a lot of that I had to finish trimming out the decks. You see a little of this in some earlier photos where you see the white primer of a new trim board on the posts and skirt boards of the decks (like the photo just above). So that got in the way of stone work, but the two had to move forward together in any case.
Screen porch posts, boxed out, scratch coat done, and starting on stone.
Screen porch posts done:
On to the front entry posts. I needed a stone base for these so I first covered the posts with weather proof membrane, then boxed them out, scratch coat and finally stone. Scratch coat completed:
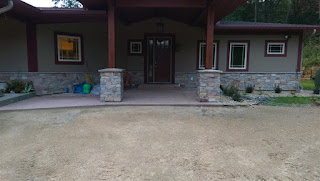
Stone completed:
And the cap blocks in place, both front and screen porch. These are wider versions of the limestone I used as cap blocks on the walls.
And that wraps up stone work, finally! Well, not quite. I am still going to do a pair of pillars at the bottom of the driveway with lights, but that is a next year project, if I have time. If not, it is a next-next year project.
We also had a bunch of landscaping work going on later in the summer. I was too busy with stone, so we hired the guy who did the smaller stone walls to do that. As part of that I trenched in a pair of conduits running down the driveway to plan ahead for the future pillars at the road.
Next up - landscape work.


No comments:
Post a Comment