The cabinets along the wall were put in a little before we moved in (Aug '15), as previously shown. We got lucky and were able to get the counter tops for that part moved up, so we were only roughing it for a couple weeks after move-in. After that focus shifted to the radiant for a couple months (go see that post), and then back to kitchen cabinets with the island for much of the winter. After a lot of work on doors and drawer fronts, the island got installed in Mid January. I was able to predict it enough ahead to get the granite folks in to measure a week later, and then install 2 weeks after that. I needed a week after install to get a bunch of details cleaned up. This timing worked out surprisingly well. The island was ready within a couple days after the main installation, and the granite guys showed up on time and measured and then installed 2 weeks later. This isn't the end of the kitchen work, but it really helps make the kitchen much more functional.
So a few pics of the island build in the shop for starters.
Island interior with doors and drawer fronts mostly in place
A bank of drawers on the outside - no wasted space!
The tall bar top drawers including the massive recycling drawer at the end
Laying out the curve for the curved front section
First curved section laid out
Making copies...
The framework completed for the front curved section. Looks kind of boat-like, no?
Skin clamped onto the front
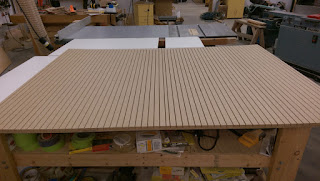
How I made the skin. I took 3/4" MDF and ran a saw kerf every 1" or so, a little over halfway thru it. This made it flexible enough to bend to match the curved framework. Very tedious...
Skin glued and screwed in place.
I made a ton of veneer by resawing to cover the MDF skin
Gluing on the veneer 2 pieces at a time. Very time consuming - One section per day.
More gluing veneer...
Veneer completed.
Finishing - I masked off the areas the trim will go so the glue would stick to the wood, as it won't stick to the finish.
Finishing done.
I needed an inside curved section to complete the assembly, so I laid up the curved plywood piece you see on top here. This will be more obvious in subsequent photos.
The base all in place and ready to go.
And installed!
During install - nearly complete
During install
You can see the upper curved section in this photo and the next couple better. The area where you see the 2x4's spaced every few inches will be tiled when we tile the backsplash on the wall cabinets also.
The plumbing nightmare under the sink. It took a lot of head scratching to get it all fitted together under there with what I had to work with.
Don't you love the temporary dishwasher handle?
Island basically complete with drawer fronts and doors installed and pulls in place.
Another view. The dishwasher front is a big improvement over the 2x4 handle I think...
And the new upper cabinet in place, but without doors yet.
Still a lot of details to finish up, not surprisingly. There are many more important items to wrap up, so I left the trim and other items to finish up later. I need to do toe kicks, a lot of simple trim, the vent hood enclosure (I started it, but need to finish and install), cover panels on the ends of the island - stuff like that. And the bar top. I have the wood for that but need to make it. I will probably attack some of that next winter, but getting interior doors in place will be a higher priority so it may get put off for another year even. We'll see how it goes... At this point everything in the kitchen is now functional, just not fully finished off. Really great progress to have that done.


