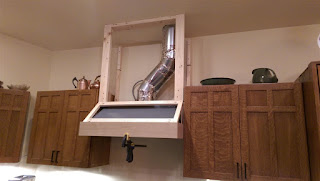
While I was going to get to the first few doors next, I took a short detour to work on the bar top for the island and the enclosure for the vent hood.
The hood is actually just a "liner" that is intended to be covered with something for finish purposes. This will be just matching the cabinets. It has been a bit of a challenge as it is hard to reach up and over everything without standing on the cooktop. The sides are permanently affixed, but the front is removable as an access panel if I need to get to the electrical or the duct for some maintenance reason. It is held on with a few magnets.
Before photo (nothing in place):
And during sorting out how to build it:
And completed and fully installed just before Xmas 2016:
-----------------------------------------------------------------------
The bar top is made out of white oak similar to the floor. I also finished it to look more like the floor than the cabinets. If it was the same darker finish as the cabinets, it would have looked too dark and massive. With such a large area, seasonal wood movement was going to be an issue for sure. To help deal with that, I made the whole unit with pieces set up in a radial fashion - essentially radiating out from the center of the curves. I started with a full size template drawn directly from the bar top cabinets allowing for a decent 12" overhang for the eating bar side.
Here is the template sitting on the work bench and table saw. Boards are rough cut and being laid out in rough orientation:
Needed more room to work, so I pulled the truck out to create some floor space. This shows working through the layout. Each piece is custom cut at various angles to best fit the curve. The cuts were made by following a pencil line from the template on the bandsaw, and then cleaning that up on the jointer. Fortunately each section is not critical as to how exactly it ends up, as long as the final 2 ends are about right. The one section at the far end is actually straight for most of the run where it is over the tall cabinets. These are first glued up in subsections of 3-5 boards that end up 18-24" wide:
And most of the rest of the subsections glued up. After those are done, they will all get sanded flat and then glued up into larger sections that will also need to be sanded flat. The ultimate goal is 3 larger sections that will get assembled in place on the island. This thing is heaaaavvvvyyy.
There was an interim step of running all the subsections through a 24" drum sander to level them out (which is why I kept the sections under 24"...) which isn't shown here. Then those sections were further glued up into 3 main pieces - a corner section, and the 2 wings of it. To join the sections together, I used countertop drawbolts from the bottom side. To do those, I needed to route in pockets to the bottom. On the very last joint, the bit pulled out of the collet on the router and bored a hole completely through my bar top! Grrrr, Photo of that hole below. This required me to make a new piece to replace that one, after cutting it out. Extra hassle I did not need, but it worked out.
Then it was assembled onto sawhorses upside down, first to route for the drawbolts, then to begin finish sanding and shaping the edges to final form. Below are 2 of the pieces joined with the repaired board at the far right.
And fully assembled and the perimeter cut to the pattern.
Here is the top side, after routing the edges and final sanding:
And after finishing, the 3 sections were bought to the island and glued and clamped-up in place into one mass. This was set up on blocks for working room.
The next day, the blocks were removed one by one stepwise to minimize stresses on it as it was lowered into place. Then it was screwed down from underneath. I still have not done the trim on the front of the island, but that is not top of the priority list now.
All done! Next up I will make the first 2 doors for the house, and then I will shift to the Master Bathroom.


