Wednesday, December 30, 2015

Deck ceilings - Spring 2015

We specified tongue and groove 1x6 boards for the deck ceilings.  They were to get stained before putting them up, so were done by me wholesale, one after the other in the garage in the early summer.  I set up a decent run where I could do a dozen boards at a time.  I would run the back side the first night, then flip for he show side, then run a second coat on the show side the second night (only one on the back).  It got crowded in the garage:

That took a good 2 weeks to get everything stained as it was 2 full evenings for each set.  You can see the already stained ones peeking around the front of the car, and the stack of unstained boards at the upper right.

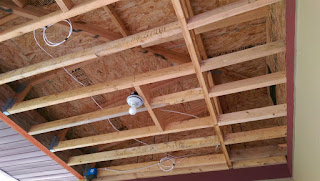
I also had to add additional framing to cut down on the span as these are only 1x's.  This is the upstairs balcony, but they all got the same treatment:

Having left these ceilings, and the attached soffit open for the first winter, we had some roommates that had decided to move in.  There were a few squirrels living, or just enjoying the cabin experience up in the soffit across the garage side.  before the ceilings could be put in, these guys had to go.  The soffit ran from the kitchen deck (shown below) to the screen porch, so they had access at both ends.  We closed up the screen porch to force them one way, and set traps there.  Within 2 days I had 2 dead squirrels.  Shortly after, one more joined their friends in the great Nut Tree in the Sky.  If there were any more left, they beat feet for the forest as I ran out the kitchen deck, but left a couple traps as the only access point, and nothing showed up (Photo 3rd down):


You can see the ports way down at the end.  I left those for a few days as this was now the only way in or out.  With no hits after that time, I figured they were all gone, so I finished it off (and have seen no signs since).

So here are some of the completed ceilings:


There was a little remaining trim work to be done up there, most of which got completed in the fall, just before the weather turned bad (no photos - still needs to be painted...)


Monday, December 28, 2015

Bella's Bathroom Tile

The Princess wanted pretty much every square inch of her palace tiled.  We didn't do that...  The final plan was to do the floor and baseboards from tile.  This was a travertine (a natural limestone) which was very difficult to get.  The tile store ended up having to pull in bits and pieces from several stores to get enough for our small bathroom order.  Apparently is was very popular/discontinued/no longer in production/etc so it was a tough thing to get, but they did a lot of work finding it for us (The Tile Shop in Woodbury - thanks!).  Now the Princess wanted something more than ordinary, so we settled on a field of the travertine in a running bond pattern, with a 2" border of glass tiles set in a couple inches from the perimeter.  This was very complicated to do, and frankly it took me longer to do this bathroom than it did to do the entire kitchen and laundry room.  But in the end it looks goooood, so we'll roll with it....

Here's the subfloor and the "Ditra" tile substrate.  I knew I was going to end up higher than the wood floor, so I used this to keep the difference to a minimum.  I had to add an additional subfloor to meet tile specs for natural stone, so I added the minimum (again due to the difference in floor height) so here is 3/8" plywood screwed down:
Now you might be asking why there are 2 sets of screw holes through much of this.  I was most of the way done,l and a cold chill enveloped me - I had forgotten about the radiant tubing below the floor.  CRAP!  So I pulled out the screws that were slightly too long and replaced them with shorter screws next to them and hoped I had not hit tubing.  I tested it a couple weeks later and was sunk - it leaked down like crazy, so it was clear that I hit the tubing, probably multiple times.  So I lost a zone in the radiant, which is unfortunate as the bathrooms are the nicest places to have that running.  Ah well, nothing I can do now...

So here is laying out the tile to see what it would look like:
Seemed to fit the room well, so it was time to move ahead.  Here is the orange "Ditra" stuff that is the tile backer:

Then after sticking that down I started with the perimeter 2" or so in travertine.  I needed that down as a baseline to work from.  The glass tile will not dive into the linen closet as it is not visible, so it will basically trace the room as normally seen.


The next step is placing the field while still maintaining the necessary spacing for the glass tile accent.  This took an extra day to let some stuff cure before walking on it to get back into the nooks.  Behind the toilet I let the glass runout straight into the wall as there is no need to trace the wall behind the toilet, and it helped aligning the pattern.


Next up was the baseboard.  I struggled with how to make this look right.  Leaving the top edge square would not look good.  It needed a round over or something.  I ended up figuring out a bevel that i could cut on the tile saw that made it look a lot better.  Here is the jig I made for that.

Just enough to hold the tile and still clear the saw (barely).  So here is the baseboard in place:


Now finally on to the glass accents.  Like I said, this took longer than the entire kitchen and laundry room...  I'll spare you most of the details, but suffice it to say that not everything lined up perfectly, so there was some fitting that had to happen, and the joint behind the door to the BR is where some "slop" had to occur.  Someday there will be a door there so it will not be visible.


So the Princess is fully ensconced in her tower now...except the sink was still pretty much thrown together to get her "something" and it was a sink I picked up on the way home one day as it was sitting by the curb near our old house.  Perfect to make it work for the interim, and the price is right!  I don't have pics of the whole thing completed, but I got it done before we moved in in August.

Flash forward to August: Then the entertaining part happened.  A day into living in the new house, and the upstairs bathroom didn't flush or drain right. This was Sat, so I called the plumber and waited to hear.  Mon AM I get a call back from the boss "weeeellll it could be anything, probably some construction debris in the pipes, and we really don't do repairs, but I'll send out the guy who worked on it to check it out and make sure it isn't our fault"  Gee how could there be debris in the pipes when I have been the only person working on this the past couple years, and the plumbers were religious about taping off the drain pipes?  Hmmm.  So the plumber that did most of the work shows up at the end of the day and he figures it out pretty quick.  He forgot to connect the standpipe from the upper floor to the drain stack!  So it filled up with water from testing and then a little use, and then finally wouldn't drain at all (not that it really was draining, just filling up).  So this sorry sack had the fun part of draining out a 2 story 3" pipe that was full of water..and worse.  But of course, had he connected it up in the first place, none of this would have happened.  So he got it connected and finally all was working.  And these are the professionals!  Wonder why I do things myself?  In his defense, he said "Well I cannot blame anyone but myself for this and I am sorry".  He fixed it without bleating about it, so I said "No worries.  If you blame yourself, nobody is going to argue with you."  He agreed.  And all is working now.  Like it would have been if I did it myself.  For $10k less.  The first time. Unions...the scourge of America.

Shop dust collection piping - winter 2014/15

I had the main tools all in and connected by the spring of 2014, and I had been using the shop for quite some time by now (tools were moved the previous winter), but I had not started on the ductwork for the final dust collection system until this time, even though I had the actual dust collector in place (ahem, "collecting dust...") since the previous summer.  I had previously run 2 smaller dust collectors in the old house and had been rolling one of those around for use as needed here.  I was tripping over everything in the shop as I had 2 extra dust collectors there and a general lack of organization, driven by lack of time.  So getting ductwork ordered and hung plus my new systems started up was a big milestone in improving workflow.  So here is the ductwork going up.  I used the rolling scaffold to help out with this.  It was quite a dance getting that around all the equipment already in place.  I hadn't moved the lumber out of the old house at this point, so that helped a bit.  This is Jan 2015.  Happening in parallel with fixing up and clearing out the old house to be able to list it for sale:


And here is all the ductwork wrapped up and connected to everything:


The miter saw station was a tough one to do.  I came up with a box and a floor register vent down below to get as much of the dust as possible.  Miter saws are always tough to collect dust from, but this works OK.  I could screen the front a bit more with some heavy plastic sheet to improve airflow, perhaps, but it's OK as is.


The real kick to the DC system is the automation.  I created a system several years back, with an eye towards moving into the expanded shop where all the blast gates at each tool are pneumatically controlled.  You press a button at the tool, the blast gate opens, and the DC starts up.  It's really not complex, but of course each one of these tools needs its own control wires and tubing, so it looks like a rats nest of connections.  This is a big time and hassle saver for me...at least once it was all done. A big thank you to my friend Chris K from RPI who helped me get the electronics all set up for this...many years ago...

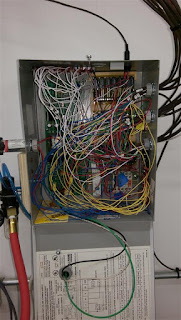
The pneumatic control box on top, with the electronics box below (not completed yet)


The electronics control box completed.  It looks worse than it is:

And one of the control switches that are at each tool.  You can open/start the system, close it, or close all, in case another gate is open for another tool at the same time, or no matter where you are in the shop, you can shut it off without running around to find the tool that is on.  But each one does have an indicator light so you know which one(s) is/are on.

Tile work - Winter 2014-15

The first and most critical tile work was the lower level tub enclosure.  Since this was going to be the functioning full bathroom that was needed by code to get an occupancy certificate, this was next up.  The tile was a beautiful mosaic of marble and small blue Onyx squares.  The marble was 2 different colors - Jerusalem Gold running vertical, and Crema Marfil Running horizontal in a basket weave pattern.  When you look at it, it really does give the illusion of an actual basket weave.  It cost way too much, but it really is gorgeous.  It came in 12x12" sheets on fiberglass mesh, like most mosaics do:

I got the backer board up over 6 mil Poly for waterproofing, and cut in a niche for soap, shampoo, etc.  Taped all the seams as required, not shown here:

With some prep ahead of time, I was able to get some really good progress in one day of setting tile:


I think it was another 2-3 days for setting the rest of the tile, and the pencil border around the perimeter and the niche openings.  Then grouted it in an afternoon, and pretty much all done except caulking:


There is still some cleanup on the surrounding drywall that needs to be done yet today (end of 2105), but that will be part of the final wrap-up and finishing of the room, when I get to that down the road.  For now, it looks good and works well.  This wrapped up in late Feb/early March 2015, and then the plumbers were able to come finish their work so I could FINALLY get the final inspection done.  Many months after I wanted to be to that point.

I had been setting the backerboard for the kitchen tile along with the work in the LL shower.  When I had leftover thinset from the shower, I would go use it up to stick down the backerboard for the kitchen floor.  I finished up the backerboard and taping the seams and then the plumbers came to put in the kitchen sink (the other key plumbing requirement for occupancy).  I went to the local Habitat for Humanity store and picked up a used cabinet for $20 (did the same for the LL bathroom vanity), dropped in a free sink I found (dumpster diving) and had the plumber connect those.  You can see the lonely kitchen sink here with the backerboard done:


Before I called for final inspection, I figured I should get the kitchen tile done.  We used the same tile in the laundry room, so I did that at the same time.  So I pulled the sink cabinet, and went at the tile.


Laundry Room:

It took 4 days/evenings to set all the tile, and then another 2 days to complete grouting everything.  The tile is a porcelain called Serengeti Slate which is made to look like actual slate but without the downsides of natural slate (porous, weak, tends to delaminate/flake).  It is really nice tile, and wasn't even very expensive.  Very impressed with this.  They had a couple different colors, and we chose the "Sunset" color as it fit best with the house color scheme.  They had a gray that looked a lot like the regular slate most people are familiar with.  Porcelain is just about the most durable tile you can hope to get, so this should last forever,

And here is the kitchen all grouted and edges caulked around the wood floor:
You will also note the "kitchen sink" is back in place for final inspection.

 I don't recall the actual date we did the final inspection, but it was shortly after finishing the kitchen tile - late March/early April 2015.  I needed the inspector out of my way so I could continue to get work done without worrying about him anymore (technically not allowed to do plumbing until we occupy the house, but it is a dumb rule that is made by the plumbers union to protect their cash flow, so I have little regard for that rule beyond what was required to pass final).

Final inspection came and he found a few minor things he wanted "fixed" or changed.  Most code rules are well-thought out and there for a good reason...some code rules are just dumb and the results of politics (see plumbers rule above...).  But nonetheless, I made all the fixes he wanted and we passed the re-inspection a couple weeks later.  He had a few good points, and a few dumb ones - probably about 50/50 - so I take the good with the bad, and move on.  One of those items was that we needed the kitchen appliances in place (working stove and fridge) even though the cabinets were not done, so I got those ordered and crudely set them in place for the final re-inspection.  It got us a pass, at least.

Next up is some work on getting the shop fully functional with dust collection which was going on largely in parallel with this tile work.